Labels

Showing posts with label Snacks. Show all posts

Saturday, December 21, 2013

Bar Nuts

The first time I had these cashews, I'm pretty sure I ate the entire container.  They are delicious and slightly addicting.  Luckily, I was able to get the recipe.  They are a fun little gift to make during the holidays.  It's a nice salty break from all of the sweets.  I like to put them in glass jelly jars, because they are quite pretty.


Fresh rosemary is a MUST! And this recipe uses quite a bit.  If you become addicted to these cashews, like I am, you will probably start growing your own rosemary.


I mean look at that goodness... you know you want to whip up a batch of these NOW!  So just do it, you won't be sorry.


Bar Nuts (*adapted from Union Square Cafe Bar Nuts)
4 c. of cashews (1.5 pounds)
1/4 c. chopped fresh rosemary
1 tsp. cayenne pepper
4 tsp. brown sugar
2 tsp. coarse sea salt
2 T melted butter

Roast nuts in a 350* oven for 7-10 minutes, or until golden brown and starting to smell good. (Watch carefully, they will burn in a hurry).  Meanwhile, combine remaining ingredients to make a paste (of sorts).  Pour paste onto hot nuts and toss until every last nut is coated.  Allow to cool completely, then package as desired (or just pour in a pretty bowl and serve at a party).
WARNING: Severely addictive


Monday, June 11, 2012

Spicy Garbanzo Beans Snackers

I'm currently watching what I eat, AKA trying practice some extra self control on the food situation! Which, it seems like each time I intend to do this, the temptations come in full effect. Ugh.
 See, the thing is, is that I ordered my wedding dress direct from China and it is tini-tiny.  So I am trying to be extra "good" for the 2 months before the big day, so I am able to actually breathe on my wedding day.
All of that nonsense brings me to the recipe today.  These little numbers are oh-so freakin' good and pretty darn healthy for you, too!  Think fiber, b-vitamins, & minerals in the beans, plus a dose of heart heathy fats from the olive oil and a little metabolism boosting cayenne pepper.  A perfect substitute for chips, nuts, and other snack foods.  Wholesome and Mmm-mmm! 

This is super simple.

Drain and rinse a can of garbanzo beans (chick peas) really well.  Pour onto a flat surface and pat dry.


In a medium bowl, combine seasoning & oil well.  Dump the beans into the bowl and toss to coat thoroughly.


Spread beans out on a parchment line baking sheet. Bake for about 20 minutes, then give a good stir and bake an additional 15-20 minutes, or until golden and crispy.  Keep a watchful eye the last few minutes.  Allow to cool completely and snack away.
Feel free to double the recipe if you really start munching on these little numbers.


Spicy Garbanzo Beans Snackers


1 15-ounce can garbanzo beans, drained & rinsed
1 1/2 teaspoons extra-virgin olive oil
1/2 teaspoon paprika
1/4 teaspoon cayenne pepper
1/4 teaspoon cumin
1/2 teaspoon garlic powder
Preheat oven 400*.  Pat the garbanzo beans dry with paper towels.  In a medium bowl, combine spices & oil.  Add garbanzo beans and toss to coat in spice mixture. Pour into even layer on parchment line baking sheet. Bake for 20 minutes; Stir. Replace in oven for 15-20 minutes or until browned and crispy. Keep a watchful eye for the last few minutes, so ensure they don't burn. Cool completely. 
Recipe Adapted from: Our Best Bites


Monday, June 4, 2012

Cucumber Hummus Bites

Do you ever get invited to a BBQ (or something like that) and not know what to bring?  
You want to bring something healthy, but you don't want it to go untouched by guests?  
Maybe you are trying to lose a few and desperately need something at the party that you can eat without overindulging?
Or maybe you simply prefer some healthier items to balance out your typical burger fare?
What ever it may be, these little cucumber appetizer bites are the thing to do.  I'm telling ya, they are the next big thing at your family get-togethers!  
They look like you spent all day making them, when actually it took about 10 minutes.
They are perfect finger food...and who doesn't like finger food?
Look at these Beaut's:


To start, prepare some of my delicious homemade hummus!  Or if you're in a rush, buy some from the super market.  If you haven't made your own before, give it a whirl.  It's easy and you can tweak it to your taste preference. 


Then, Peel an english cucumber like SO:


Slice cucumber into 1-inch rounds.


Spoon hummus into plastic bag and snip off one of the bottom corners for a make-shift pastry bag.


Squeeze hummus through "pastry bag" on top of cuke rounds, sprinkle with sesame seeds (use black sesame seeds for a pretty presentation) and course sea salt.


Serve to your friends for a healthy, pretty and fun appetizer or side dish.  Enjoy!
D

Friday, April 27, 2012

Kale Chips

I'm a serious snacker....and usually when I start, I can't stop.  Since I'm such a compulsive snacker, things like potato chips, cheese, etc. are a BAD idea.  Does anyone else have this problem?  
Well, guess what?  I've found a solution!  KALE CHIPS.  They are pretty much like a baked potato chip, but a kale chip, get it?  You can snack away, without the guilt.
Super easy, super quick, super healthy and surprisingly tasty.

Here's what you need:
1 bunch of kale, washed & torn into large chunks (2"x2"ish)
olive oil
sea salt
cayenne pepper (or another seasoning of your choice, I'm all about the spice!)


Preheat oven 375*. Place kale in large bowl....drizzle with oil....sprinkle with seasoning.  I use my hands to mix it all together...but you could also use a utensil, of course.


Dump the mixture out onto a baking sheet and spread out evenly.  Bake 15-25 minutes or until brown and crispy.  Cooking time may vary.  Just start checking around 15 minutes and continue to peak every few minutes until they look like little crisps!


Remove from oven and allow to cool.  They will get crispier upon cooling.  These are so good, you've got to give them a whirl....even if you don't like kale!


I apologize for the pictures.  This was a really hard thing to photograph and my creative juices weren't flowing very well!
Happy Snacking!
D

Tuesday, February 21, 2012

Hummus

Since I AM a dietitian, I have decided that I must post at least 2 healthy posts to each of my naughty posts.  I was going to share an awesome chocolate chip cookie recipe with you guys, but that will have to wait until later in the week.  Today we are going to make homemade Hummus.
Making your own hummus is SO much more economic and tasty than the pre-made stuff from the store.  Plus, it's free of preservatives because there's no way it's going to last that long once you whip up a batch.
I seriously recommend using a food processor, something that I am not blessed with in the trailer.  As many of you know, I chose to take my blender with me over my food processor because I thought it had more uses.  I wish I had more storage space in here because I would bring my food processor and my Kitchenaide stand mixer.  Oh how I miss those two lovely gadgets in my life.
Ok, so back to the hummus.  Use a food processor if you can, but a blender (mixer or potato smasher) works pretty good.

Start by rinsing those garbanzo beans really, really well until the water runs clear, with no bubbles.  This helps reduce sodium content AND reduces some of those "gases" we associate with beans :)  Both things that most people are trying to reduce in their lives! 


Roughly chop some gaaaarlic. (that's my Boston accent coming through, haah!)


TAHINI, my friends, is the secret to good hummus.  It's pretty much like peanut butter, except it's made out of sesame seeds instead of peanuts.  You usually find it in the grocery store next to the peanut butters.
It's all natural, with no hydrogenated oils, so the oil will settle on the top.  Give it a good stir and store it in the fridge once you open it.
I always store my natural nut butters, Adam's peanut butter & tahini, upside down in the fridge.  That way the oil is on the bottom of the jar and I don't spill it all over when I try to mix it up.  Just another little "trick of the trade"


Combine beans, tahini, seasoning, oil, water and lemon juice in your blender or food processor; pulse until smooth.  You will obtain a much smoother consistency in a food processor.  Add more water if necessary.

Serve with fresh veggies, pita chips, or put on your favorite sandwich or wrap.
Hummus is a great source of protein, fiber, iron, plenty of B-vitamins and minerals.


You could also add a flavor punch to your hummus by adding sun-dried tomatoes, pesto, roasted garlic, etc. etc. etc.
Enjoy this lovely snack, guilt free!

Hummus

1 (14 oz. can) garbanzo beans (AKA chickpeas)
2-3 tablespoons tahini
2 cloves garlic, roughly chopped
2 tablespoons lemon juice
1/4 teaspoon cumin, or more to taste
2 teaspoons olive oil
2-3 tablespoons of water, (or more to achieve desired consistency)
salt to taste

Rinse beans well.  Combine all ingredients in food processor/blender and pulse to combine.  Continue to pulse, adding more water if needed, until desired consistency is achieved.
Garnich with fresh herbs (cilantro, basil, etc).
Serve with veggies, chips or use as a condiment on sandwiches/wraps.
Can be stored in the fridge for about a week.


Tuesday, January 17, 2012

Granola

I was going to post this really great salad dressing today and I got on The Pioneer Woman's blog this morning and she posted salad dressing!!!  Then I got on Tasty Kitchen and they had a salad dressing on their homepage, too!  So in order to be as original as possible, I will save my dressing for another day and instead post a different healthful recipe.  I don't want you all getting bored :)

I am still super excited about today's recipe.  I got the idea from my mom, because she had homemade granola at her house when I was visiting over the holidays.  Since I polished off all of her granola, I decided to make some of my own and try to decrease the sugar, fat and calories... 3 things that hide in so-called "healthy" granola.  Many are well over 400 calories per cup!  

This recipe makes about quart jar and a half; you can easily double the recipe if you end up liking it and want to keep more on hand for you and your family.  Many granola recipes call for some funky ingredients, but this one is pretty simple and many of the items you may already have in your pantry.  This recipe has been a hit with Greg (the hungry Lineman!), his mom, my mom and many more.  It's definitely a keeper and "granola cruncher" approved!  


I was lucky enough to take these photos in my Mom's kitchen that has wonderful lighting (with my new camera).  Enjoy, because any upcoming posts will be back in the trailer, with not so great lighting!!

Can you tell yet that this post is a little unorganized?  I forgot to take a photo of all the ingredients!

Here are the dry ingredients:
Oats (not the quick cooking kind)
Wheat Germ (could also use oat bran, ground flax, etc)
Chopped Pecans (feel free to use your fav nuts)
Craisins (or raisins)
Dried Apples (or any other dried fruit)
Cinnamon

Add above dry ingredients to a large bowl.


Here are the wet ingredients:
Honey
Vanilla
Applesauce (unsweetened)
Canola Oil **(optional, helps the "crunch" factor)

Put honey in medium sized microwave safe bowl for 30 seconds to liquify.  This makes it easier to combine with other ingredients.  Add applesauce, oil** and vanilla to warn honey and stir well.


Stir the dry ingredients thoroughly, so everything gets some cinnamon spice.


 Add the wet ingredients to the big bowl of dry ingredients.


And stir that baby up really well.  You want every single oat to have a little love on it from your wet ingredients.  This will also help you achieve that "crunch" we associate with granola.
Hello Granola Crunchers!!!


Pour mixture onto parchment-lined baking sheet and spread evenly.
(**If you haven't got a roll of parchment paper yet, DO IT!  It's the best)


Place in preheated (325*) oven and bake for 15 minutes, then stir.  Continue to bake another 20 minutes or until edges become golden brown.  Once edges turn brown, it should be done.  It may not feel "crunchy" yet, but this will happen upon cooling....but if you like really, really crunchy, allow it to cook a few more minutes.
You may need to bake an additional 5-10 minutes depending on your oven, placement of your oven racks and how "crunchy" you really like it.  Mine took 25-30 minutes total.
  
***Be careful not to overcook though.  Granola will go from perfectly golden brown, to over-done in a matter of minutes.  So check it often towards the end of bake time.


There's those golden edges I'm talking about.  It's done!
Oh and if you like clumpy granola, refrain from stirring during baking.
Allow to cool completely on baking sheet.  Once cooled, your granola should be crunchy!!

I forgot to mention that while this is baking, your house will smell absolutely heavenly!  Like the best apple-cinnamon scented candle or Scentsy that you've ever encountered!
I'm serious, it's ama--azing.
Make it before you have company.  They will be captivated and thoroughly impressed!!!


 Sprinkle over yogurt.


Have it with milk.


Put it in a baggie for a quick snack.  
Put it in a mason jar on display.
Get crunching on this deliciousness!


xoxo -- "D-Trash"

Granola

3 cups oats
2 tsp. cinnamon
2 tbsp. wheat germ
1/2 c. chopped nuts
1/2 c. craisins
1/2 c. dried apples (or other dried fruit)

2/3 c applesauce, unsweetened
1/4 c. honey
1 tsp. vanilla
1 TB canola oil**

Line a large baking sheet with parchment paper  (or nonstick cooking spray) and preheat oven 325*.  

Mix dry ingredients thoroughly in a large bowl.  Put honey in medium sized microwave safe bowl for 30 seconds to liquify.  Add applesauce and vanilla to warn honey and stir well.  Add wet ingredients to the large bowl and stir until all dry ingredients are coated.

Pour mixture onto parchment-lined baking sheet and spread evenly.  Bake for 15 minutes; stir.  Bake an additional 15-20 minutes and check again.  Replace if edges haven't turned brown yet, checking avery few minutes. Once edges turn golden brown, it's done.   Granola firms (gets crunchy) upon cooling.  Allow to cool on baking sheet then pour into airtight container for storage.

(This recipe is roughly derived from this recipe on Fat Girl Trapped in a Skinny Body blog)

**You aren't imagining it, I added a TB of oil to this recipe.  It seems to turn out even better.  But if you are going for "lowfat" feel free to leave this out. 


Wednesday, October 26, 2011

Pumpkin Seeds. The. Best. Ever.

Ah, Roasted pumpkin seeds.  Does this bring back any childhood memories?  Carving pumpkins and then getting to eat the slimy seeds? Or perhaps a memory of trying to do them without Mom for the first time and almost burning the house down? Or, maybe that's just me.
Well I rediscovered pumpkin seeds as an adult a couple years ago thanks to my best friend, KayCee.  She made this recipe before a road trip to Portland and we proceeded to eat about a gallon of seeds.  G.I. distress, later?  You bet!  We met our fiber quota for the next month!
But really, this recipe kicks some serious butt, in more ways than one!  (no pun intended, lol) Of course, if you've been reading my blog you can guess that they are spicy, but they are also healthy and full of healthy fats, protein, a little vitamin A & K, plus lots of minerals.

Here's what you need:
Do my seeds look different than yours?  Mine are pepitas, which are the seed found inside the shell of your ordinary pumpkin seed.  Did I take hours to shell out my pumpkin seeds myself?  Heck no! I bought them in bulk at the store.  Carving messy pumpkins in a travel trailer does not sound fun to me, so I took the easy way out.
Place a few cups of seeds on a baking sheet (no need to grease).
Drizzle with a few tablespoons of worchesterhire.  This doesn't have to be a precise measurement, but enough liquid to coat all the seeds well.
Another fun fact, did you know worchestershire has anchovies in it?!  How do you say worchestershire?
"Wor-chester-shi-re"
"Wor-sh-sh-sher"
"Wor-sh-sher"
I prefer option # 2.  Probably all wrong, but it's fun to say.

Now for the heat.  Sprinkle about 1/2 tsp of cayenne (more or less depending on your preference). I love cayenne because it gives you a nice kick without the long burn of other hot peppers. Also about 1/4 tsp of sea salt.

Stir really well, until everything is coated and spread the seeds evenly.


 Place in preheated oven (350*) for about 20 minutes (give or take).  Checking and stirring every 5 minutes or so.


Continue until the seeds are deep golden brown and have a good crunch when you pop them in your mouth.  Be careful, they go from perfect to burnt in a flash, so check them a lot towards the end.


Now sit down and enjoy with a seasonal Oktober beer!


Disclaimer:  High Class Trailer Trash is not responsible for lack of self control when trying to stop eating these morsels.  We are also not responsible for "fiber belly" if eaten in excess!

Peace & Love!
D

Recipe in Full:
Roasted Pumpkin Seeds
2 c. pumpkin seeds (pepitas or the real ones)
3 Tbsp Worchestershire
1/2 tsp Cayenne Pepper
1/4 tsp Coarse Sea Salt

Preheat oven to 350*.  Place seeds on baking sheet and top with seasonings.  Stir until seeds are well coated, add more worchestershire if needed.
Place in oven for about 20 minutes, stirring every 5 minutes until deep golden brown and crispy.

Tuesday, September 6, 2011

"The Usual"

Greg and I spent an awesome weekend in Boise.  I must say, I'm in love with that town.  I think I could live my life there.
Anyways, we went to all of our favorite hotspots for dining (Red Feather, Protos, Java) and even tried out some new places (Fork, Bittercreek Ale House).  They were all to-die-for!  We also went to the farmers market.  I really should have taken some pics because Boise has a really impressive farmers market.  This is the best time of the year to get all your produce locally.  Boise has their market twice a week, which is even more convenient!  You can stock up on your weekly goods or even buy in abundance and preserve.  This is the time of year that we have a bounty of goods!  So take full advantage of this little sliver of time, where we can have fresh, local food.  Here's some of the loot I picked up at the market:


Ahhh, fresh, homegrown tomatoes.  They are heavenly, but I haven't always held this opinion.  Growing up I thought people who ate raw tomatoes had a serious problem.  Well like most things edible, I have learned to love them.  BUT the junk we can buy at the grocery store does not do a tomato justice.  So stock up on some local tomatoes and stay tuned for some stellar recipes this week.

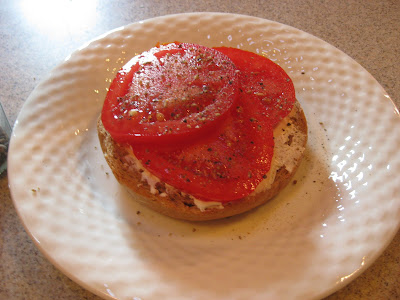
I'm going to break it to you gently.  I stocked up on tomatoes at the market, for one major reason.  I wanted to re-create "The Usual," which is a breakfast you can order at Java Coffee in Boise.  It's simple, delectable, and addicting.  So as soon as you can, try this out!
Here's what you need:

Fresh tomato
Fresh ground pepper
Cream cheese ( I use lowfat/neufchatel)
 A bagel, I used whole wheat but "everything" bagels would be delish, too (This is what Java uses).
Simply toast that yummy hunk of dense bread, spread with cream cheese, top with sliced tomato and fresh ground pepper.  There's breakfast.    You could also play around with an herbed cream cheese.  Trust me on this one, you will love it.
Cheers! D