Labels

Wednesday, September 28, 2011

Lemon Basil Shrimp with a Kick

I love me some shrimp, good shrimp that is.  Many people grossly overcook shrimp and they become tough and chewy.  This recipe would be a great on a night where you have nothing planned for dinner, because most of the ingredients you can keep on hand.  If you don't have fresh herbs or lemon, use dried herbs and lemon juice (you know, the one in the jug that looks like a lemon!).  And of course, bagged shrimp is a good thing to keep in the freezer because they thaw quickly and cook in a flash for an instant gourmet meal!  You could serve this over linguine with some steamed veggies for a complete meal.


Here's your ingredients:


Please, thoroughly rinse your shrimp, any time you use frozen shrimp!  It helps remove some sodium and other crap they put on it to preserve.  Plus it takes away the "fishiness."  Rinse for at least a minute under cold water.  This is also a great way to thaw your frozen shrimp.
Chop that lovely basil (or use ~1 Tablespoon of dried) and cut the butter into small pieces


Add your spices/salt/pepper and lemon juice.  (notice my gorgeous bowl?)


Give a good stir and try not to drink this like cereal milk straight out of the bowl! Numnumnum...


Here's the part where you can choose your method of madness.  If your going to grill (like me....less dishes, DUH!), make a foil packet to place your shrimp in.  If you are going to bake, place in a smaller baking dish (9x9ish) and pour that scrumptious sauce over the top.


Please refrain from eating raw shrimp.  I've seen it happen, and it's not pretty.  I was cooking shrimp one time and they were still raw on the counter.  Along strolls a hungry man looking for a pre-dinner snack and BOOM!, he eats a raw shrimp before I can even stop him.  Got a good laugh from that one. (ahem, Brandon!)

Fold it all up like a Christmas present so you don't lose any juices, you will need them later, I promise!


And place on your hot grill (or preheated over @ ~350).  Now it will take less than 10 minutes if your grill is hot.  Maybe 5-8 minutes, just until they are pink throughout (a little longer in the oven). Once all the grey color is gone from the tail, it's done!


Pour juices and all into a serving dish.  Finger lickin' good.  If you're like Greg, he mows through these like crazy leaving oil stains on his jeans, shirt, hands, cupboards, etc.  You get the idea.  That's how good they are.  Oh, and remember not to eat the tail in your state of shrimp-mowing, gluttony.  Wash down with a dry white wine like chardonnay or maybe even a pinot noir.  Cheers.


Lemon Basil Shrimp with a Kick

1# raw shrimp (tail on, deveined, thawed)
1/4 c. olive oil
2 tbsp butter, cut into small pieces
1/2 tsp red pepper flakes
1/2 c. fresh basil, chopped
2-3 tbsp lemon juice
salt & pepper to taste

Thoroughly rinse shrimp in a collander.  Combine remaining ingredients in a small bowl.  Place shrimp in foil packet to grill or in a baking dish and pour sauce over the top. Grill/bake just until shrimp turn pink, don't overcook!  Pour juices and all into a bowl to serve.  Can be served over linguine and steamed veggies. Pair with a dry white wine.


Friday, September 23, 2011

Caprese Salad with Balsamic Reduction

This might be my favorite salad of all time.  It's so simple, yet delicious and beautiful.  As for the balsamic reduction.  I usually just make a big batch for a couple reasons ... 1) It shrinks down a ton, so it's always less than you expect. 2) It takes awhile, so you may as well make extra and keep some in the fridge. 3) It's so yummy that you'll find yourself putting it on all kinds of things: salads, burgers, in dipping oil, etc. The Caprese salad is gorgeous in red, green, and white ... just like the Italian flag.  


Here's what you need: olive oil, balsamic vinegar, salt/pepper, fresh basil, tomatoes, and mozzarella.  Fresh mozzarella is tastiest, but it's more expensive.  You're choice!


The only thing you need to do to prep is chop your basil, slice tomatoes and cheese.  For the balsamic reduction, pour a hefty amount (no specific measurement) of vinegar into a saucepan and bring to a boil.  But trust me and do more than you think because it shrinks.  Mine was probably an inch deep in the pan and when it was done, it barely covered the bottom of the pan.   


Reduce heat and simmer for 20-30 minutes.  Give it a periodic stir and breath in to clear your sinuses!  Also you may find yourself crying for no reason. Don't worry, it's just the fumes!  They get pretty wild.  Hopefully you don't have any random visitors show up, they will wonder what the heck is going on.

Continue to simmer (not boil), until it begin to thicken.  It will stick to your spoon when it begins to get there.  It won't quite be syrup-like, but it will achieve this upon cooling.

This is how it should run off the spoon.  (Notice the pretty bowl I got at the Boise Farmers Market)
Now arrange your salad so it looks like a lovely Italian flag, then drizzle with olive oil, salt/pepper and your cooled balsamic reduction.  Which arrangement do you like better?
Bon appétit!

Tuesday, September 20, 2011

Rosemary Focaccia Bread

This focaccia bread recipe is SO good and honestly easy.  I had to make it twice last weekend (Friday & Sunday)! It's practically fool-proof.  It's great to take to dinner parties to make people think you are a really good cook.  They won't be able to believe that you made this wonderful, tasty yeast bread all by yourself.  It tastes like heaven AND you won't be spending $5 bucks on some artesian loaf from the bakery.  You should have most of the ingredients in your pantry.  That said, I decided to pair the bread recipe with a beautiful salad.  The classic Caprese salad shows off those yummy summer tomatoes..... and once you eat a whole loaf of warm homemade bread, the only thing you'll have room for is a salad anyway! I'll post the Caprese salad later this week.

Just as a little teaser, here's the finished product.  It's oh-so worth the time.


We'll start with the focaccia bread.  Here are the ingredients you'll need.  I also wanted to note that I derived this recipe from a great food blog called "Our Best Bites."  They have lots of awesome recipes, but this one I use over and over.
 Combine 1 tbsp yeast and 1 tbsp sugar in a bowl.  Sugar is not for flavor in this recipe; it is food for the yeast to help it grow.  And I wouldn't recommend using your measuring cup as a bowl.  You'll see why later !!
Add 1 cup of warm water (110 degrees).  I don't use a thermometer, but I turn my faucet onto hot and let it run until it's too hot to hold my hand under it.  It's important to have warm enough water because if it's too cold, it won't activate the yeast, but if it's too hot, it will kill the yeast.  Give this mixture a good stir and let sit for 10 minutes.
 While yeast is working it's magic, measure your dry ingredients.  In a large bowl, combine 2 c. all-purpose flour (no bread flour necessary), 2 tbsp rosemary, 1 tsp sea salt, & 1/4 tsp oregano.
 And this is why you don't use your measuring cup for your yeast.  I was trying to use one less dish and it backfired.  BUT this picture shows you how bubbly and fluffy your yeast should get.  AND, yes that's a wine glass in the background but I swear I was drinking water out of it!
Now dump your yeast mixture into flour mixture and add 1 tbsp of olive oil.  Begin to stir together with a wooden spoon.  If I had my KitchenAid mixer, I would use it here with the dough hook.  But there's no room for those bulky appliances in the trailer so I use my buff arms to get a little workout.
 Stir until it makes a sticky dough (seen below) and slowly add remaining 1/4-1/2 cup of flour.  DO NOT add more than this.  The dough should be really soft, you don't want a big hard lump.
 After you add remaining flour, it should look like this.  A really tender dough, maybe even slightly sticky.
Place dough in a large bowl coated with cooking spray, cover with plastic wrap and allow to sit in a warm place for 45-60 minutes.  I like to put my dough in a sunny window.  My granny always put hers on top of the fridge, but I always thought that was kind of a dusty place to put such a thing!  Maybe that's just my fridge, but I doubt it!  Let it rise until it doubles in size.
 Now here comes the best part.  I'm not sure if this is even necessary, but I think it should be.  Put on your game face, act mean and give your dough a big ol' punch! Hi- Yah! Then dump it out onto a floured surface.
 Divide into 2 halves and knead each of these only about 5-10 times.  Just enough to work out most of the air and to form into something resembling a loaf.  They can be round or oblong, whatev.
 Place your loaves on a greased cookie sheet, cover and allow to rise another 45-60 minutes.  If you cover with plastic wrap, it sticks a little when you remove it.  I think a damp cloth works best.
 Once they are nice and big, coat the top with olive oil (I use the olive oil spray), and sprinkle with rosemary and sea salt.  If you aren't going to eat this within the first day (I can't imagine doing this), hold off on the sea salt on top.  It gets a little soggy over time.
 Bake in a 375* oven for 15-20 minutes, until golden brown.
 Can you say, yum? gorgeous? tantalizing? addicting? YES! All of the above.  Enjoy with a slop of warm butter or oil/vinegar.  Pure pleasure.
Now once you polish off a loaf to yourself, make a mental note to 1) not step on the scale for a few days and 2) add some extra cardio to your workouts ...but MOST importantly relish in the delightful pleasure of homemade bread without any preservatives or artificial ingredients. Oh yea and wash it down with something yummy. I'd hate to see you choke on something so delicious! ;)

Rosemary Foccacia
1 c. warm water (~110 *)
1 tbsp yeast
1 tsbp sugar


2 1/4-1/2 c. all-purpose flour
1 tsp. course sea salt
2 tbsp. rosemary (dried)
1/4 tsp. oregano
1 tbsp. olive oil

Combine first 3 ingredient in a medium bowl and let sit 10 minutes.  Combine 2 cups of flour, spices and olive oil in large bowl.  Once yeast mixture is bubbly/fluffy, add to flour mixture.  Stir until sticky dough forms, then slowly add remaining flour (NO more than 1/2 c) until a soft-dry dough forms.  Place in a greased bowl, cover and allow to rise for 45-60 minutes.
Once dough doubles in size, punch it down and pour onto floured surface.  Divide into 2 halves, knead each half 5-10 times and form into 2 loaves.  Place loaves on greased cookie sheet, cover and rise for another 45-60 minutes.
Once loaves are doubled in size, brush (spray) with olive oil and sprinkle top with sea salt and rosemary. Place in 375* oven for 15-20 minutes or until golden brown.

Thursday, September 15, 2011

Spicy Grilled Pork Salad

I love to cook meals that are pretty to look at.  When they look nice it usually makes them taste better, too!  This recipe is similar to recipe one posted by thepioneerwoman.com, who I love.  She has a great blog that covers all arenas: cooking, home-keeping,  homeschooling her kids, etc, etc.... and now she even has a cooking show on the Food Network.  Her recipe uses steak, and I used pork, plus I spiced things up a bit.
But really you could use any meat that you have on hand.
So the first part of this recipe is making the marinade for your meat.  I tend to make a similar marinade each time I make one and it usually involves olive oil, soy sauce, lime juice/vinegar, brown sugar and other yummies.  But all marinades have a few requirements to work their magic.  You need an acid (vinegar, citrus juice), oil (EVOO, sesame), and flavor (herbs, spices, extracts, ginger).  The acid tenderizes the meat (can also add flavor), the oil moisturizes and of course, your flavor component adds the "wow" factor in taste.
Here's the marinade for meat that will go on top of this salad:

Brown sugar, marsala wine, soy sauce, olive oil, ginger, garlic, and lime juice

You can see me grating my fresh ginger here.  Now combine everything in a shallow pan and then add your pork chops, cover and refrigerate at least an hour.  Flip half way through.

 And here's the best secret about fresh ginger.  It's one of my favorite flavors, so I always keep it on hand.  It doesn't last that well on the counter or in the fridge, SO I keep mine in the freezer and it lasts forever!  Then when you are ready to use it, grab your microplane grater and get after it, peeling and all. It makes really fine, minced ginger and you don't even have to peel it.  A microplane grater is as essential as toilet paper!  You must have one!  They rock for hard cheeses, ginger!, chocolate, etc.  You'll get your moneys worth, I promise.  You get so much more volume from grated cheeses and such, so you'll actually save money because your block of parmesan will last Waaaaay longer.  Ok, I'm going to get off my soap box now.

Ok, moving on to the salad dressing. Put a tablespoon of honey in a coffee mug and pop it in the microwave for about 15 second or until it's liquified.  Then add your soy, oil, minced garlic, chopped jalapeno, ginger and lime juice.  Whisk it all together with a fork and set aside.  You can taste test and see if you need to adjust any flavors.


Ok, now prep your salad veggies.  I used red leaf lettuce, tomatoes, carrots and cilantro.  You can use whatever you like, but be sure to include cilantro.
Throw your chops on a hot grill. (sorry I didn't take pics of this!)


While the chops are grilling, prep your salad bowl.  Toss with salad dressing, make them pretty!


Remove your chops and let rest 5-10 minutes.  Then make thin slices of meat and place them over your salad. YUM. Dig in.


You could really use any meat here or any salad greens/veggies that you like.  Full recipe below!

Meat Marinade
1/4 c. low sodium soy sauce
1/4 c. olive oil
2 TB marsala wine, or any cooking (or drinking!) wine you like
1/4 c. packed brown sugar
3 garlic cloves, minced
1 lime, juiced
2 TB fresh ginger, grated/minced

3-4 boneless pork loin chops

Combine all ingredients in a shallow baking dish (8x8 dish or small casserole pan).  Place your meat in the dish, cover and refrigerate at least an hour (preferably 4 hours or longer).  Flip meat 1/2 way through marinade time.
Heat grill to high heat and place chops.  Cook about 5 minutes per side or until internal temp is 140 degrees.  Remove from grill and allow to rest 5-10 minutes.  Then thinly slice.

Salad Dressing:
1-2 TB honey
3 TB soy sauce
1/4 c. olive oil
2-3 garlic cloves, minced
1/2 of a jalapeno, chopped, seeds removed
2 TB ginger, minced/grated
Juice of 1 lime

Put honey in a microwave safe coffee mug.  Nuke for 15-20 seconds or until honey is liquified.  Add remaining ingredients and whisk together. Lightly toss your favorite salad greens.

Friday, September 9, 2011

Namaste, Jackson Hole!


We had to spend the last 2 days in Ashton, Idaho, which is nestled between West Yellowstone and the east side of the Teton Mountain range. Since we were only staying 2 days, we left the trailer behind and got ourselves a motel suite! I'm talking high class, baby. Anyways, I wanted to share some pics from this last little road trip.  
Here is our quaint hotel suite (AKA Cabin, AKA Shed) Haha.

 With the lovely, modern decor...
 But the view topped it all off.  There's something about seeing mountains that makes me feel at ease.

So by day 2, I had seen everything Ashton had to offer (actually by about the first morning).  So I decided to go on a quest to Jackson Hole, Wyoming.  I have been taking online yoga classes from a site based out of Jackson since about 2007, so I wanted to attend a class in person. Here is the site if anyone wants to check it out.  My favorite instructor is Neesha.  www.yogatoday.com
I attended her class and it was wonderful! Very enlightening and spiritual. This site has 1 free class per week, or you can buy classes for $3.99. (you can watch them as much as you'd like).  It's a great option for practicing at home.  I usually do about 2 classes per week.

Besides the yoga class, the views were the best part of the trip.
I thought this picture turned out cool.  This is approaching the range from the Idaho side.

 Getting closer

And closest! This is from the Wyoming side of the range.  Seriously breathtaking.  No joke. If you haven't seen this range, it's a must-do on the ol' bucket list.


I also went on a short little hike on the top of Teton Pass (elevation. 8431') And I was gasping for some oxygen in that thin mountain air!


The gorgeous and hardy wildflowers were still out at this high elevation.

I didn't get to do much cooking this week, but I'm feeling some scrumptious burgers in my near future and possibly a bright, fresh salad.
Namaste,
D

Tuesday, September 6, 2011

"The Usual"

Greg and I spent an awesome weekend in Boise.  I must say, I'm in love with that town.  I think I could live my life there.
Anyways, we went to all of our favorite hotspots for dining (Red Feather, Protos, Java) and even tried out some new places (Fork, Bittercreek Ale House).  They were all to-die-for!  We also went to the farmers market.  I really should have taken some pics because Boise has a really impressive farmers market.  This is the best time of the year to get all your produce locally.  Boise has their market twice a week, which is even more convenient!  You can stock up on your weekly goods or even buy in abundance and preserve.  This is the time of year that we have a bounty of goods!  So take full advantage of this little sliver of time, where we can have fresh, local food.  Here's some of the loot I picked up at the market:


Ahhh, fresh, homegrown tomatoes.  They are heavenly, but I haven't always held this opinion.  Growing up I thought people who ate raw tomatoes had a serious problem.  Well like most things edible, I have learned to love them.  BUT the junk we can buy at the grocery store does not do a tomato justice.  So stock up on some local tomatoes and stay tuned for some stellar recipes this week.

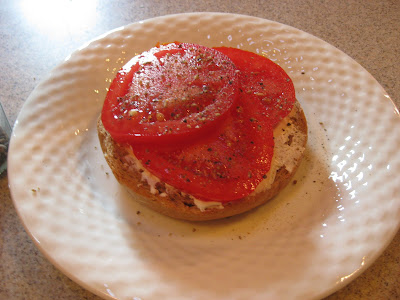
I'm going to break it to you gently.  I stocked up on tomatoes at the market, for one major reason.  I wanted to re-create "The Usual," which is a breakfast you can order at Java Coffee in Boise.  It's simple, delectable, and addicting.  So as soon as you can, try this out!
Here's what you need:

Fresh tomato
Fresh ground pepper
Cream cheese ( I use lowfat/neufchatel)
 A bagel, I used whole wheat but "everything" bagels would be delish, too (This is what Java uses).
Simply toast that yummy hunk of dense bread, spread with cream cheese, top with sliced tomato and fresh ground pepper.  There's breakfast.    You could also play around with an herbed cream cheese.  Trust me on this one, you will love it.
Cheers! D